

Our Resin Driveway Installation Process Explained
Resin driveways have become one of the most popular choices for homeowners across Cheshire, thanks to their modern appearance, durability, and low maintenance. But what really sets a high-quality resin driveway apart is the installation process. Done properly, a resin surface can last for many years without issues. Done poorly, problems can appear quickly.
Here’s a step-by-step guide to how a professional resin driveway installation should be carried out.
1 – Initial Consultation & Site Survey
Every successful project starts with a detailed consultation. We assess your existing driveway, measure the area, and discuss your preferred finish, colour, and design. This is also where we check drainage and suitability for a resin-bound system, ensuring everything complies with SUDS (Sustainable Urban Drainage Systems) regulations where required.
2 – Ground Preparation
Preparation is the most important stage of any resin driveway installation. A solid, stable base is essential to prevent movement, cracking, or sinking over time.
If there is an existing surface such as concrete or tarmac in good condition, it may be suitable as a base. If not, we excavate the area and install a new sub-base, typically using MOT Type 1 stone, which is compacted thoroughly to create a strong foundation.
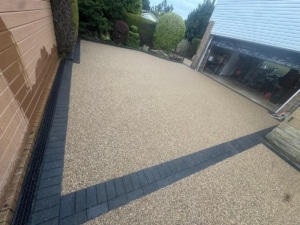
3 – Edging Installation
To ensure the driveway holds its shape and remains structurally sound, we install high-quality edging. This could include block paving borders or kerb edgings, which not only add strength but also create a clean, defined finish that enhances the overall appearance.
4 – Base Layer Installation
A resin-bound surface requires a suitable base layer, usually asphalt or concrete. This layer must be laid perfectly level and allowed to cure properly before the resin is applied. Skipping or rushing this stage can lead to long-term issues, so it’s critical that it’s done right.
5 – Resin Mixing & Application
Once the base is fully prepared, we move on to the resin application. The chosen aggregate (stone) is mixed with UV-stable resin in a forced-action mixer to ensure a consistent blend.
The mixture is then spread evenly across the surface and hand-trowelled to a smooth, seamless finish. This creates the attractive, stone-like appearance resin driveways are known for, while also forming a durable, permeable surface.
6 – Finishing Touches
After the resin is laid, we carefully check the entire surface for consistency and finish. The edges are refined, and the area is left to cure. In most cases, a resin driveway can be walked on within 24 hours and driven on after 48 hours, depending on weather conditions.
7 – Aftercare & Maintenance Advice
One of the biggest advantages of resin driveways is how easy they are to maintain. We provide simple aftercare guidance, such as occasional pressure washing and keeping the surface free from debris to maintain its appearance.
Why Professional Installation Matters
While resin driveways offer many benefits, their performance relies heavily on proper installation. Cutting corners—especially during the preparation stage—can lead to costly repairs in the future.
By following a proven process and using high-quality materials, we ensure every resin driveway we install is built to last, looks exceptional, and adds real value to your property.
A resin driveway is more than just a surface it’s an investment in your home’s appearance and functionality. With the right installation process, you can enjoy a driveway that is durable, permeable, and visually stunning for years to come.
If you’re considering a resin driveway in Rochdale, Oldham, Bury or the surrounding areas, choosing an experienced and reliable installer is the key to getting the best results.


Leave a Reply
Want to join the discussion?Feel free to contribute!